Google Slides is an amazing tool. You can make the usual presentation, but you can also do so much more!
Newsletters, posters, class newspapers, and computer-based manipulative activities are all great ways to use Google Slides in the classroom. As our elementary teachers use their Chromebooks more and more in their classrooms, they have been looking for ways to create quick formative assessments and activities that they can assign in
Google Classroom for their students to complete in order to practice skills they are learning in math, ELA, science, and social studies. One way they are accomplishing this goal is by creating Google Slides manipulatives that they can assign to their students in Google Classroom.
Here are some examples:
Google Slides manipulatives are fairly easy to create. The important thing is to place anything you want "locked down" on the Slide Master. This way the students will not be able to move around or delete that item. Here is how to edit the Slide Master in a Google Slide in order to create a manipulative.
 Step 1
: Open a new Google Slides presentation
Step 2: Click on "Untitled Presentation" and title your manipulative
Step 3: Click on the "Slide" menu and select "Edit master"
Step 4: If you want to change the fonts for the entire presentation, do so on the top slide labeled "Master". If you want more font choices, click the font menu and select "More fonts..."
Step 5: After your fonts are set the way you want them, click on the first of the "Layouts" slides. This will become your first template for your manipulatives. Remember, what you put on this slide will be "locked down" and students will not be able to move it. Think to yourself - what do I want on the background? If this were a worksheet, what would be on the page that I copy for my students? You may need to delete the title and subtitle sections if you don't want those on your slide. Simply click on those placeholders and click backspace or delete.
Step 6: Add your background elements. When adding elements, keep these things in mind...
- Adding Text: There are four types of text boxes you can add. The first is the usual "Text box". This is static text and cannot be edited unless you are in the slide master. This is great for titles, directions and text you don't want to be changed by the students. The next type of text boxes are the "Placeholders." These are to be used to add spots where you want the students to type. There are three different placeholders, Title, Subtitle, and Body text. The difference is simply which default font it uses, and "Body text" also has the bullets.

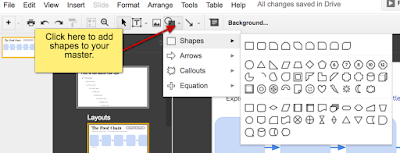
- Adding Shapes: There are numerous shapes native in Google Slides that you can add and recolor for your presentation. There are four major categories: Shapes, Arrows, Callouts, and Equations. Hover your mouse over each major type to see the shapes available in each category. Once you add a shape, you can click on it to adjust the fill color and outline color.

- Images: There are also many ways to add other images to your presentation. You can go to the "Insert" menu and select images, or you can click the "Image" button on the tool bar. In both these cases, a window will pop up that allows you to Upload an image, add an image from your Google Drive, or Search for an image. You can also copy and paste images from other sources, but make sure you have the rights to use those images and you site your sources. One of my favorite places on the web for clipart is: mycutegraphics.com. A note on images - I prefer to use .png files since they have the option for a transparent background.
Step 7: Once you have your slide set up the say you want, you can move onto the next template, or if you only want one template, you can click the slide preview on the far left side of the screen. This will close the Slide Master.
Step 8: Add any elements to your slides that you want the students to manipulate.
Step 9: Add more slides as necessary.
To share the presentations/manipulatives with your students, simply assign it in Google Classroom. Make sure you select "Make a Copy for Each Student"!
NOTE: As of this post, you cannot move around objects in Google Slides using the touchscreen on the touchscreen Chromebooks. Your students will need to use mice or the touchpads.


Comments
Post a Comment