When teachers first start using Google Docs, one of the questions I most frequently get is "How do I easily share my documents with ALL my students without having to type every single name in on each document?" As a teacher, I completely understand the importance of this question. Sharing documents is one of the most important features of Google Docs, but if it becomes a time and management nightmare, who would want to use it? Well, I have some good news! There are a few methods that you can use that will make it easy to share documents with your students all year long! Here is the first and simplest method. It involves setting up a distribution/contact group in your Gmail, then simply sharing any documents with that distribution/contact group.
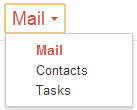
At the upper-left corner of your gmail, you will see the compose button and above that the "Mail" title.

Click on "Mail" and you will see this drop down menu, select "Contacts".
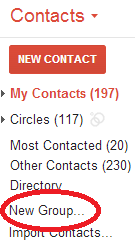
Now under contacts you will see "New Group". Click there...
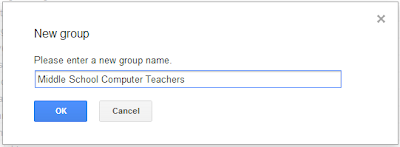
Enter a name for your new group in the dialog box that pops up (example: 1st hr physics 2013-14). Click OK
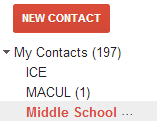
Now that the group has been created, there are a couple of different ways to add your students to your new list.
Method 1: Go to your new list and add contacts directly from there.
At the top of your contacts, click on the person with the "+" sign. Click in the text box. Begin typing a name and choose from the selections available. Remember, student email addresses are firstname.lastname@portageps.org. Then click "Add".
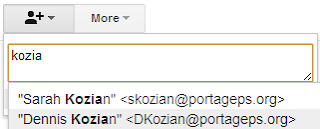
Note: You can type and select multiple contacts prior to clicking "Add".
Method 2: Go to the individual contact who wish to add to a list.

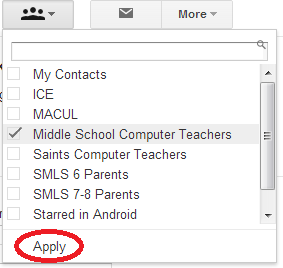
Click on the "body" button with three heads.
Select the group you wish that person to belong to and click "Apply". This contact has now been added to your list.
TO SHARE A DOCUMENT WITH THIS GROUP...
Method 1: Compose an email and in the "Recipients" (or To:) field type the name of your group. It should appear as a selection. Then attach your document to the email.

Method 2: In the document you wish to share, open the sharing menu and you can type the name of a your group rather than entering each email individually.
METHOD 1: Distribution/Contact Group
Step 1: Begin in your chrome browser while visiting your PortagePS Gmail.At the upper-left corner of your gmail, you will see the compose button and above that the "Mail" title.

Click on "Mail" and you will see this drop down menu, select "Contacts".

Now under contacts you will see "New Group". Click there...

Enter a name for your new group in the dialog box that pops up (example: 1st hr physics 2013-14). Click OK

Now that the group has been created, there are a couple of different ways to add your students to your new list.
Method 1: Go to your new list and add contacts directly from there.

At the top of your contacts, click on the person with the "+" sign. Click in the text box. Begin typing a name and choose from the selections available. Remember, student email addresses are firstname.lastname@portageps.org. Then click "Add".

Note: You can type and select multiple contacts prior to clicking "Add".
Method 2: Go to the individual contact who wish to add to a list.

Click on the "body" button with three heads.

Select the group you wish that person to belong to and click "Apply". This contact has now been added to your list.

TO SHARE A DOCUMENT WITH THIS GROUP...
Method 1: Compose an email and in the "Recipients" (or To:) field type the name of your group. It should appear as a selection. Then attach your document to the email.

Method 2: In the document you wish to share, open the sharing menu and you can type the name of a your group rather than entering each email individually.
Comments
Post a Comment