Need to print this tip? Click here for a printable version.
Although the need to print student documents has significantly decreased, there are still times when you want to print multiple student docs at one time. For example, maybe you assigned a writing assignment in Google Classroom that you want to print for their writing folders. You could go into each document individually and print it, but this can be a time consuming process. Instead try using the app PDF Mergy to combine the documents into one PDF. Then you only need to print one document.
WARNING: Just because you can print lots of docs at once, doesn't mean you should! Please use this tip with caution and save paper whenever possible!
To get started, you will need to go to the Chrome Web Store and add the app PDF Mergy. Once you have the app added to chrome, you are ready to go.
If You Assigned the Docs in Google Classroom
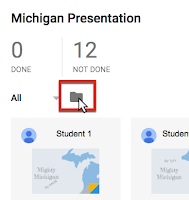
Go to the assignment in Google Classroom. Open the assignment so you see the thumbnails of all the students’ documents. Click on the folder icon. This will open the folder for that assignment in Google Drive.
If Students Share the Docs with You
Go into the Shared with Me section of your Google Drive and select the documents. If you need to search for the documents, you can narrow down your search by using the advanced search features. For example, if you know it is a Slides presentation, you can choose Presentation for the type, or if it is a Google Doc, you can choose Text Document. If it is a student’s document, choose Not owned by me for the Owner. If it was a document they turned in recently, choose Last 7 days for the modified date. Put the title of the document in the Has the words section. Then click the blue search button. This will narrow down your choices.


Although the need to print student documents has significantly decreased, there are still times when you want to print multiple student docs at one time. For example, maybe you assigned a writing assignment in Google Classroom that you want to print for their writing folders. You could go into each document individually and print it, but this can be a time consuming process. Instead try using the app PDF Mergy to combine the documents into one PDF. Then you only need to print one document.
WARNING: Just because you can print lots of docs at once, doesn't mean you should! Please use this tip with caution and save paper whenever possible!
To get started, you will need to go to the Chrome Web Store and add the app PDF Mergy. Once you have the app added to chrome, you are ready to go.
Find the documents you want to print.
Here are some tips to finding the documents.If You Assigned the Docs in Google Classroom
Go to the assignment in Google Classroom. Open the assignment so you see the thumbnails of all the students’ documents. Click on the folder icon. This will open the folder for that assignment in Google Drive.

If Students Share the Docs with You
Go into the Shared with Me section of your Google Drive and select the documents. If you need to search for the documents, you can narrow down your search by using the advanced search features. For example, if you know it is a Slides presentation, you can choose Presentation for the type, or if it is a Google Doc, you can choose Text Document. If it is a student’s document, choose Not owned by me for the Owner. If it was a document they turned in recently, choose Last 7 days for the modified date. Put the title of the document in the Has the words section. Then click the blue search button. This will narrow down your choices.

Select the Docs you want to Print
Once you have found your documents, you will need to select the ones you want to print. If you want to select them all, you can use the keyboard shortcut (ctrl+a), or you can click and drag to make a box around all the documents. If you only want to select a few, you can hold down the ctrl key while you click on the docs you want.Open Docs with PDF Mergy
The next step is to open the docs with PDF Mergy. To do this, right click on the selected documents. Choose Open With and select PDF Mergy. If this is the first time you are using PDF Mergy, you may need to give the program permission to access your files by clicking Allow.

PDF Mergy will open in a new tab. After a moment or two, your files will appear in the tab. Click and drag on the name of the files to reorder files, if needed. You can also delete a file if you don't want it included by click on the trash can that appears when you hover over the file name. Once you have them in the order you want, click the Merge button.

The merge may take a couple minutes depending on the number of files.

Once your files are merged, you will be asked to Save the document. You can save it to your Computer or to your Google Drive. Click the button for your preferred choice. Name your file and click save. Open the saved file - it will be in PDF format. Print as normal. Done!
